Welcome to the wonderful world of sewing, where every stitch carries the promise of creativity and craftsmanship! Whether you’re a seasoned seamstress or just beginning your fabric journey, understanding the ins and outs of different stitching techniques is essential to achieving those flawless results we all dream about. In our latest post, “Nahttypen Breakdown: Choosing the Correct Stitch for Perfect Results,” we’ll guide you through an exciting exploration of various stitch types from classic straight stitches to intricate decorative patterns. By demystifying each option and offering practical tips on when and how to use them, you’ll be equipped to elevate your sewing projects from ordinary to extraordinary. So grab your needle and thread; let’s embark on this stitching adventure together!
Introduction to Nahttypen (stitch types)
When it comes to sewing, the right stitch can make all the difference. Whether you’re crafting a delicate garment or tackling a heavy-duty project, understanding Nahttypen or stitch types is essential for achieving professional results. Each type of stitch serves a specific purpose and can elevate your work from ordinary to exceptional. But with so many options available, how do you know which one is best suited for your fabric and project? Let’s dive into the world of stitches and explore how making informed choices can enhance your sewing experience!
Importance of choosing the correct stitch for different projects
Choosing the correct stitch is crucial for achieving professional results in any sewing project. Each stitch serves a specific purpose, and using the wrong one can lead to frustration and disappointment.
For instance, a straight stitch is perfect for seams on woven fabrics, while a zigzag stitch adds flexibility to knit materials. Selecting the right type ensures that your fabric behaves as intended during wear and washing.
Moreover, different projects require varying levels of durability. A buttonhole needs a sturdy finish, while delicate hems demand finesse. The appropriate stitch not only enhances functionality but also elevates the overall aesthetic of your creation.
Investing time in understanding stitches pays off significantly. It allows you to tailor each technique specifically to your fabric choice and desired outcome—ensuring that every project turns out just as envisioned.
Understanding the factors that determine the right stitch for a project
Choosing the right stitch begins with understanding your fabric type. Each material behaves differently when sewn. For example, lightweight fabrics like silk require delicate stitches to avoid puckering.
The purpose of your project also plays a significant role. A garment meant for daily wear needs durable stitching, while decorative pieces can embrace more intricate styles without sacrificing function.
Consider the end use as well. Items that will undergo stress like seams on jeans demand robust stitches, whereas embellishments may only need a simple yet elegant touch.
Finally, think about how often the item will be washed or worn. Stitches must hold up over time, ensuring longevity and performance for everyday items versus special occasion garments. Choosing wisely guarantees satisfaction in every finished piece.
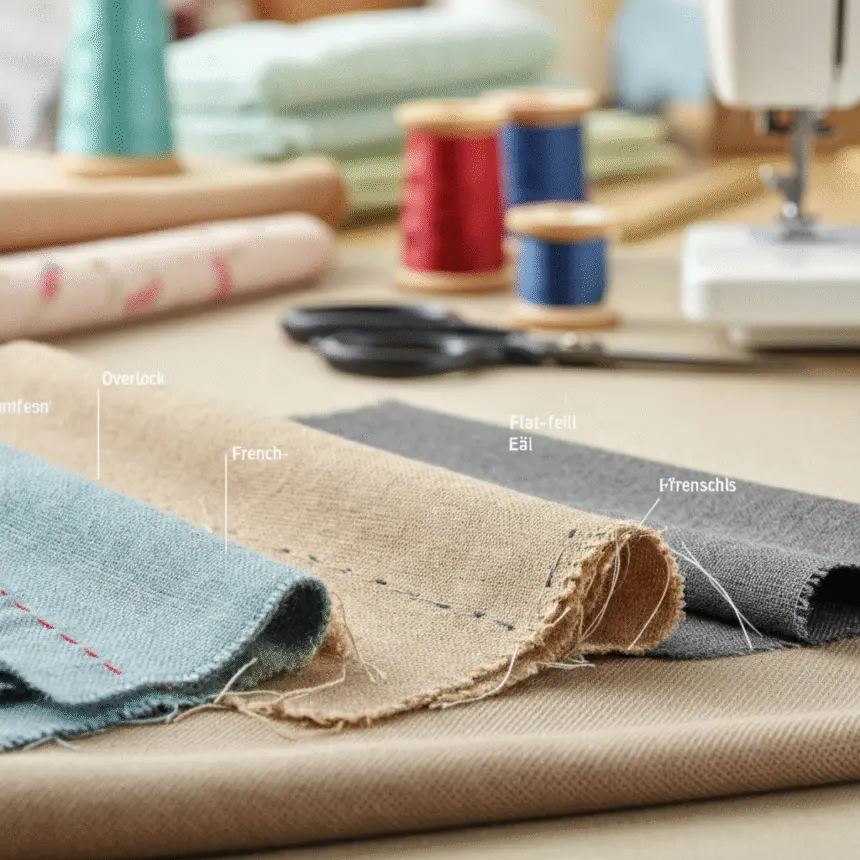
Detailed breakdown of different types of stitches and when to use them:
The straight stitch is the foundation of sewing. It’s perfect for basic seams and topstitching. Use it on woven fabrics like cotton or linen.
Next, there’s the zigzag stitch. This versatile option allows for stretch in knit fabrics. It’s excellent for finishing edges to prevent fraying.
Satin stitches create a smooth, glossy finish ideal for embellishments and monograms. They work beautifully on delicate materials like satin or silk.
For those raw edges, overlock or serger stitches are essential. They trim and finish in one step, making them perfect for knits and activewear.
Blind hem stitches are fantastic when you want hidden hems that remain invisible from the front side of your garment. Perfect for trousers!
Lastly, buttonhole stitches secure buttons with style while ensuring durability. They’re most often used on shirts and jackets where functionality meets aesthetic appeal in fastening methods.
Straight stitch
The straight stitch is the most fundamental stitch in sewing. It forms the backbone of many projects, making it a go-to choice for both beginners and experienced sewers alike.
This stitch creates a simple line that holds fabric pieces together securely. It’s ideal for seams in woven fabrics, as it provides strength without adding bulk. You can use it on almost any project, from garments to home décor.
One of its best features is versatility. The straight stitch works well with various thread types and weights, allowing you to adjust according to your material’s needs.
When working with stretchy fabrics or knits, ensure you choose an appropriate needle size for optimal results. A little tension adjustment may also be necessary to achieve flawless stitches.
Next time you’re unsure what stitch to use, remember the reliability of the straight stitch it rarely disappoints!
Zigzag stitch
The zigzag stitch is a versatile and essential technique in sewing. Its unique pattern allows it to stretch with the fabric, making it ideal for knits and other stretchy materials.
This stitch creates a zigzag shape that can also help prevent fabric fraying. It’s particularly useful when finishing edges or applying embellishments. Using this method can give your project both durability and visual interest.
One of the incredible features of the zigzag stitch is its adaptability. You can adjust the width and length settings on your machine, tailoring it specifically to your project’s needs. This flexibility opens up endless possibilities for creativity.
For those looking to add decorative elements, you can experiment with different thread colors or tension settings. The result? A beautiful finish that stands out while maintaining functionality in garment construction or craft projects alike.
Satin stitch
The satin stitch is a popular choice for decorative purposes. It creates a smooth, high-shine finish that adds an elegant touch to any project. This type of stitch works wonders on embroidery and appliqué.
When using the satin stitch, tension is key. Proper tension ensures that your fabric lies flat while maintaining the glossy appearance characteristic of this stitch.
Choose the right thread; rayon or polyester blends often yield impressive results due to their sheen. Additionally, selecting a suitable needle can make all the difference in achieving clean edges.
Satin stitches are perfect for embellishing collars, cuffs, and monograms. They can transform simple designs into eye-catching pieces without much effort. With just a bit of practice, you’ll find that incorporating satin stitches into your work elevates its overall quality significantly.
Overlock/serger stitch
The overlock or serger stitch is a game changer in the world of sewing. This type of stitch creates a clean, professional finish on fabric edges, preventing fraying and unraveling. It’s particularly useful for knit fabrics, which can be tricky to handle with standard stitches.
Using multiple threads, typically three to five, an overlocker provides both stability and stretch. This makes it ideal for garments that require movement like t-shirts or activewear.
When you run your fabric through a serger machine, it trims excess fabric while simultaneously stitching the edges together. The result? A polished look that saves time and effort.
For those tackling projects involving sheer or delicate materials, consider using an overlock stitch as your go-to option. Its ability to maintain elasticity without compromising strength sets it apart from traditional methods.
Blind hem stitch
The blind hem stitch is a game-changer for anyone looking to finish hems discreetly. This technique allows you to create an invisible seam, making it perfect for garments where aesthetics matter.
When using this stitch, the goal is to catch just a few threads of fabric on the main piece while leaving most of the hem hidden. It’s commonly used in skirts and pants, providing that polished look that can elevate any outfit.
A sewing machine makes this task easier, but many prefer hand-stitching for more control and precision. The choice often depends on personal preference or project requirements.
Choosing the right thread color can also enhance invisibility. A shade that matches your fabric will yield seamless results. Experiment with tension settings too; they play a significant role in achieving optimal outcomes with this versatile stitch type.
Buttonhole stitch
The buttonhole stitch is a versatile and essential technique in sewing. It creates strong, neat openings for buttons, making it perfect for garments and accessories alike.
This stitch can be done by hand or machine. When using a sewing machine, many models come equipped with an automatic buttonhole feature that simplifies the process significantly.
For hand-sewing enthusiasts, the buttonhole stitch provides control over tension and finish. You begin by reinforcing the area around the hole to prevent fraying, then work your way around in small stitches.
Choosing this method allows you to customize both size and appearance of your buttonholes according to your project’s needs. Whether you are crafting shirts or bags, mastering this stitch adds a professional touch that elevates any piece you create.
Tips for testing and adjusting stitches for optimal results
Testing your stitches is crucial for achieving the best results. Start by selecting a scrap piece of fabric that matches your project material. This ensures you can see how the stitch behaves.
Begin with a few test runs, adjusting tension and stitch length as needed. Pay attention to how the thread lies on both sides of the fabric. It should be even and secure without puckering or looseness.
Don’t hesitate to try different stitches too. Some fabrics respond better to certain types than others, so experimentation can yield surprising outcomes.
If you’re using specialty threads or needles, swap them out during testing to find what works best together. Document your findings—this will save time in future projects and help streamline your process.
Finally, always remember that patience pays off when fine-tuning your settings for perfection in every seam you create.
Common mistakes to avoid when choosing a stitch type
When selecting a stitch type, many sewists stumble into a few common pitfalls. One major error is overlooking the fabric’s properties. Different materials require specific stitches for optimal results. Using the wrong stitch can lead to puckering or even breakage.
Another mistake is ignoring the project’s purpose. A decorative piece may benefit from an elaborate satin stitch, while functional seams call for something sturdier like a straight stitch or overlock.
It’s also crucial not to underestimate thread weight and needle compatibility. Mismatched threads can cause tension issues and uneven seams, which are frustrating to fix later on.
Lastly, skipping test swatches can be disastrous. Always experiment with your chosen stitch on scrap fabric first to ensure it behaves as expected before committing to your final project.
Other factors to consider when selecting a Nahttypen:
When choosing a Nahttypen, thread weight and type play a crucial role. Different fabrics require specific threads. For lightweight materials, consider fine threads; for heavier fabrics, opt for thicker options that provide durability.
Needle size and type also matter significantly. A larger needle creates bigger holes, which is unsuitable for delicate fabrics. Conversely, using a small needle on thick fabric can lead to breakage or skipped stitches.
Consider the project’s purpose too. Will it undergo frequent washing? Choose stronger threads that withstand wear and tear. If aesthetics are key, select decorative stitches with matching thread types to enhance your design.
Lastly, think about machine compatibility. Not all sewing machines handle every stitch equally well; some may need adjustments or special feet attachments for optimal performance. Assess these factors carefully before making your final decision on Nahttypen.
Thread weight and type
Thread weight and type play a crucial role in the success of your sewing projects. The weight determines how thick or thin the thread is, influencing both the stitch’s appearance and strength.
Choosing the right thread for your fabric can make all the difference. Lighter fabrics often pair well with finer threads, while heavier materials need thicker options to maintain durability.
In addition to weight, consider the type of thread as well. Cotton threads are great for natural fibers, providing a soft finish. Polyester offers flexibility and strength—ideal for stretch fabrics.
Don’t overlook specialty threads like metallic or embroidery varieties. They add unique textures but may require different handling techniques during sewing. Understanding these nuances allows you to elevate your projects significantly, giving them that professional touch they deserve.
Needle size and type
Choosing the right needle size and type is just as crucial as picking the appropriate stitch. Each fabric demands a specific needle to ensure smooth stitching and prevent damage.
For lightweight fabrics like silk or chiffon, opt for a smaller needle, usually around 60/8 or 70/10. This helps avoid puckering and allows for delicate handling.
Heavier materials such as denim require larger needles, typically in the range of 90/14 to 100/16. A thicker needle pierces through tough fibers without breaking.
Don’t overlook specialty needles designed for certain tasks—like ballpoint needles for knits or quilting needles with a tapered point. These can significantly enhance your sewing experience by minimizing skipped stitches and ensuring cleaner seams.
Always test your chosen needle on scrap fabric before starting your project. This small step can save you time and frustration later on.
Conclusion:
Choosing the right Nahttypen can significantly influence the outcome of your sewing projects. By understanding the various stitches available and their specific applications, you set yourself up for success. Each stitch serves a unique purpose, from creating neat finishes to providing stretch and flexibility.
As you’ve learned, factors like fabric type, project goals, thread weight, and needle size all play crucial roles in determining which stitch will yield the best results. Testing your stitches on scrap fabric is a smart way to gauge performance before committing to your final piece.
Avoiding common pitfalls such as mismatched stitches or inappropriate tension settings can save frustration down the line. With this knowledge at hand, you’re well-equipped to tackle any sewing challenge with confidence.
Whether you’re working on garments or home decor projects, selecting the appropriate Nahttypen maximizes both functionality and aesthetics in your creations. Happy sewing!